Sunday 13 January 2013

QGIS and correcting water effects

I have been spending a little time trying to get a couple of inland lakes looking like real water, rather than the flat photoscenery texture.

I have first created polygons in Google Earth around a couple of water features.  Using FSX_KML I have imported those from ESRI shapefiles into one of my SBuilderX watermasks.  So far, so good, and pretty easy.  The GE kml file is also used to generate the photoscenery and water transparency through FSEarthTiles.

However, the water transparency effects are slightly out of alignment with the watermasking produced in SBX, I think because the geo-referencing of GE and SBX is ever so slightly different.

How could I resolve this problem?  Clearly the water mask and the transparency mask polygons need to be placed in exactly the same locations with respect to each other in order for the water and transparency effects to perfectly match in FSX.   Could I amend the SBX polygons and then get the corrected polys back into GE?  If so, the photoscenery and watermasks should align correctly.

The only problem is, SBX doesn't export to kml files, but...I have found yet another very useful and free tool which does.  QuantumGIS is a fairly well featured and free GIS program.  Amongst many other things, it can import an ESRI shapefile into a vector layer and then export it as kml.

The corrected lakes now look like this in SBX.  First we do a simple export to an ESRI shapefile.


We load this shapefile into QGIS and it prompts you to input the correct coordinate reference system, which for FSX is of course WGS84.  Then we get this...


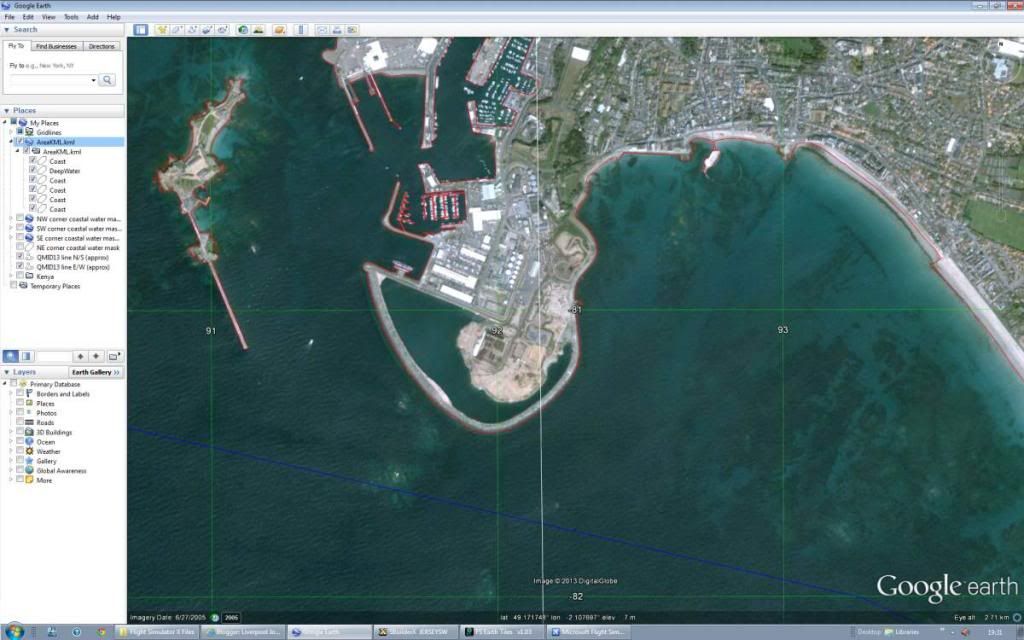
Imported into Google Earth, we then see this :)


Note that the poly outlined with a white line is my original drawn in Google Earth.  The poly outlined in red is the corrected version imported back from SBX.  With the corrected poly now part of my original kml file, I can use FSET to compile the photoscenery again and the transparency and water should perfectly align.


Tuesday 8 January 2013

A New Utility - LEC Google

I just found a new utility that could prove very useful called LEC Google.  What it does is enable you to create a LOD 9 (QMID 11) area accurately within Google Earth.

This will be useful because I've been having to run all my GE .kml files through PreFsxKml and then Fsx_KML in order to get shapefiles to import into SBuilderX, so that I can align watermasks to QMID 11 areas properly.

LEC Google will simplify this process by allowing the creation of accurate vector polygons within Google Earth from the start.  It is available for free from http://www.fsdeveloper.com/forum/showthread.php?t=328314

You can see from the screenshot a sample area I created to test it.


Monday 7 January 2013

Adding coastal islands and rocky outcrops

I've tested out how to do the little rocky outcrops and islets now so that they appear over the water rather than under it.  Previously my coastline was the main island coast only as proof of concept.

What I did was fairly easy enough.  I loaded up the .kml file that I used to create the earlier photoscenery.  (It's called Area_KML.kml because FSEarthTiles needs it to be called that).  The kml files had two polygons in it, one called 'coast' which marked the shoreline and one called 'DeepWater' which marked the edge of the blendmask.  All I did was to add some more polygons called 'Coast' to the Area_KML file, as you can see on this screenshot below.  You can see Elizabeth Castle Island to the far left of the image, separately outlined in red.


Every little islet will eventually have its own polygon named 'Coast'.  When the photoscenery is compiled these will all come out as little islands, but for the purposes of this demo I am only doing Elizabeth Castle Island itself.

However, that isn't all I've had to do.  The watermasks I created earlier need to be amended as well.  This was a simple task.  All I had to do was copy the new 'Coast' polygon I created earlier into the relevant kml file defining the QMID11 water mask.  If you remember, I created this earlier for the initial test.

I ran this through PreFsxKml.exe to correct the kml file (just as before), then created the .shp file again in FSX_KML so that I could import it into SbuilderX.  The new polygon complete with island was imported into SBX perfectly.

Using the hole technique (described in some detail in this page: http://www.newsite.fsdeveloper.com/forum/showthread.php?p=129440) I added the island to my existing water mask.  Beware though, there is one little stage missed out from this otherwise excellent tutorial!  When you select your island polygon and click 'make as hole' you then need to click on the polygon tool before clicking on the main parent polygon...  I spent a good half hour figuring this out.  Whoops!

(In SBX, remember to also add a landclass to the new island as well otherwise it won't be solid.)

So, just to recap...
  • I amended the main kml file to include the island in Google Earth.
  • Then I included that amendment to the watermask kml file in Google Earth again.
  • I compiled the new main coastline file to create landclass, and the new watermask file to create the updated water, both in SBuilderX, (after running the updated kml files through PreFsxKml and FSX_KML.)
  • I then compiled the photoscenery again using the amended main kml file in FSEarthTiles.
What I was left with was the following screenshot, showing Elizabeth Castle Island just off the shore of St Helier harbour on Jersey.  You can see the island is now properly shown above water. :)


Friday 4 January 2013

Enough detail?

Am I putting enough detail in these posts for you to understand what I'm doing?

I think I'm putting the salient points in and setting down a roadmap that other people may be able to follow..but without some feedback I'm not sure how well I'm achieving that!

Would it be helpful for me to put in detailed bullet point by point steps?
More screenshots showing what things should look like through the stages?

If it's about right or if you need something different...would you let me know please?

Progress so far with Jersey..what have I learned?

Here's just a summary of what I've gained from looking at Jersey so far..

  1. There are loads of tools out there to help make making scenery relatively easy!
    • Google Earth
    • FSX_KML
    • SBuilderX
    • FSEarthTiles
  2. Once you know the right 'flow' using these tools to produce some of your own scenery is very straightforward.
  3. Water masks, blend masks and transparency are easy to do, even for a beginner.
  4. Terrain is slightly more difficult, but for most areas you can easily buy a ready to use off the shelf mesh.  For those where it isn't available, people will get it for you, but at a cost.
    • I did look briefly on the net for the possibility of extracting Google Earth's elevation data and using it in FSX.  From my brief look it seems that it is possible but may require a bit of scripting ability in order to get the data efficiently.  That is unfortunately far beyond the scope of what I was intending to do here, so I'm not actively looking at that, but it might be an avenue to look at later. If anyone already knows how to do this I'd appreciate an email please!
With this scenery I've completed the following..
  • excluded and recreated accurate water masks, over several QMID 11 areas.
  • used an already available DEM file to create more accurate terrain levels.
  • created detailed photoscenery to sit on top of that accurate terrain.
  • included water transparency effects which are blended out into the normal FSX ocean.
I've also learned some things by making mistakes!

I tried to make the new terrain bgl active before changing the water masks and it seems that terrain is squashed by existing default water masks.  Now I've figured it out it seems obvious but I wondered why it didn't work at the time.

Also, when I was adding the new water masks, I managed to make the areas overlap in some way, which suppressed terrain across two whole QMID areas.  Eliminating them one by one from my scenery config showed which was at fault and after a minor bit of tweaking and recompiling the file in SBuilderX the terrain came back.

Up to now these stages were just proof of concept really.  To be acceptable as scenery there are a number of other things that need to be done. 
  1. There are some areas where clearly the underlying terrain is inaccurate, and I shall need to alter these by using sloped flattened areas.  This could be fairly time-consuming depending on how much change is necessary.
  2. There are various inland water features which need a water mask and transparency as well.
  3. Around the coast there are numerous rock formations and little islands which currently look underwater, because the proof of concept water masks and transparency effects were only applied to the main coastline.  There are a good number of these so I'll need to go back and amend the water masks etc to include these accurately.
All in all, to now this has taken approximately 5/6 hours because I'm learning as I go.  With a bit of practice and knowing already what mistakes can be made, it should be possible for anyone to knock out half decent and pretty accurate ground scenery without too much trouble.

NOTE: With some of the data that can be used it is really only acceptable to use it to create scenery for personal or freeware use only.  It's not a prohibitive problem, but just make sure that you don't distribute something publicly which could bring down the legal people on you.  Usually it doesn't take much research to discover the limits to how you can use a tool or some data. :)  Whatever you do is obviously at your own risk!

Wednesday 2 January 2013

Basic water masks completed

All four basic water masks completed as a test - there are still some minor niggles to work out, but more on those later!  Here it is - a top down view of the whole island in FSX.

Watermask in progress

This screenshot shows Jersey with the upper east quadrant watermask and coastline completed.

I've excluded all water masking from all four QMID 11 areas that cover the island.  Then I have put in a DEM bgl that was kind enough to have been gifted to me to create the underlying terrain more correctly.  I have placed land accurately using the Google Earth kml file I created earlier, and overlaid on that is the photoscenery test.

The one corner completed looks pretty good - there are some minor terrain issues which I will need to apply some sloped flattens to correct, but in the absence of a much more detailed DEM I'm not displeased with it!

The North-Eastern corner of Jersey with the first part of the watermasking complete.
Bear in mind this is a work in progress.  The terrain is intended to be tweaked and the photoscenery (currently at 1m/pixel) will hopefully be 30cm/pixel.